Recently I came across DVDStyler to make DVD's from some video files I have.
This is my second time trying this software. My first encounter with DVDStyler was a not very successful. But that was back in the Feisty Fawn days.
Today I take back what I said back then about DVDStyler.
I'm using version 1.7.2 and have had no real problems except for the few I will mention in this article.
It is available for Linux and Windows users which is a major plus for open source software.
The layout is simple and easy to navigate. It uses category tabs on the left to pick backgrounds, buttons and files. It's all drag and drop and allows customizing the size, color and font of the buttons and any text you add such as titles.
It converts almost any file fairly fast and allows auto-chaptering and multiple video files. Just add the file to the time line at the bottom and pop in a few sub-menus. Add text, images and frames by right clicking on the screen and make a selection from the menu.
It also offers options to choose the video aspect ratio, video bitrate, audio output of mp2 or ac3, NTSC or PAL formats. Many features but not overwhelming that it will confuse the new user.
I've been using DVDStyler to create a DVD disk and have it save the resulting disk as a ISO. Then I open the ISO with VLC media player to check it. Once I'm satisfied I burn the ISO to a DVD with k3b or you can use the burner of your choice.
The only drawbacks I have had with this DVD creator are as follows:
Background selection is minimal. This can easily be fixed by adding in your own jpg background files using root access to the DVDStyler folder.
The selection of buttons is also minimal. The buttons are svg graphics so they can be scaled to any size with out loosing clarity. Finding additional svg graphics can turn into a scavenger hunt.
When adding a sub-title (srt file) I thought I had figured it out, details and help are sketchy for doing this, but when running the conversion I received an error saying it couldn't find the font file. After a few hours of trying to find a fix I ended up using avidemux to integrate the srt file into the video then used DVDStyler to create the DVD.
I use the restricted extra codecs on my 'nix box but haven't been able to successfully convert DivX avi video files. For this problem I use WinFF to
convert the avi to a DVD compliant mpeg. That way DVDStyler doesn't have to re-encode the video file. It only needs to turn it into the vob and ifo files which only takes 10 -15 minutes depending on the file size.
That said, I have been very happy with the ease and quality of DVDStyler.
It has done what I needed it to do, is easy to use and is faster then most video converters and dvd creators.
Whether you use Linux or Windows, you should do yourself a favor and try out DVDStyler. You may be pleasantly surprised.
And in case you missed the text link you can find it here;
http://www.dvdstyler.org/
Enjoy!
TaZMAn
Showing posts with label DVD. Show all posts
Showing posts with label DVD. Show all posts
Thursday, August 6, 2009


Friday, November 7, 2008
Multiboot Linux Cd And Automake Script Download
I have been asked numerous times about providing download links to some of my multiboot disks I have made. Unfortunately, they are all over 4 gigs as they contain 8 or more distros on them and my upload speeds make that type of upload almost impossible.
So I put together a small multiboot Cd that will provide you with Damn Small Linux, Puppy Linux and Memtest.
The total size is 136 megs and is split into 2 rar files (Using the script in my previous post) and is available via the 2 Rapidshare links.
MultiCd Part 1 75 Megs
http://rapidshare.com/files/161640669/multicd.iso-Split_RAR-75Megabyte_s_.part1.rar
MultiCd Part 2 61 Megs
http://rapidshare.com/files/161640671/multicd.iso-Split_RAR-75Megabyte_s_.part2.rar
Not only do you have a small Iso file but it contains 2 fully functional Linux systems and a utility to test your Ram! Also, both are very small and fast and will work on older, slower systems with minimal Ram and hardware.
It will also help you to see how a multiboot Cd is made although I have a confession to make.
Every other multiboot disk I have ever made was created by me from scratch. I did all the tedious editting and creating both the loader and menu.
But then I found a forum post that has a script to make multiboot disks.
It supports many distros and even a WinPE compilation.
There is a slight bug however that doesn't seem to affect the final Iso.
It has to do with the genisoimage version 1.1.6
I get an error that it expected a certain value but gets a different value.
No matter. I leave it run and it usually finishes with a working Iso.
But I have had the occasional tests where the script failed after getting that error.
It is a known bug when dealing with genisoimage version 1.1.6
If you use an older version you have no problems.
I must express the fact that the genisoimage bug is not due to itself but rather the way scripts are trying to use genisoimage.
Another con of this script is that it allows a limited choice of Linux distros.
The creator of the script has done a remarkable job of adding many distros but there are some good ones missing.
Also, because many distros use the same kernel you have to be careful of which versions you add into your compilation.
Examples would be Damn Small Linux and Knoppix. They both use the Knoppix kernel. Because the kernel of each Distro needs to be in the root path of the Cd and they are named the same you can't use both on a Cd unless you do custom editting of the files needed to boot up a renamed kernel.
But other then that it does a good job of creating multiboot Iso's.
The forum post can be found here;
http://ubuntuforums.org/showthread.php?t=718016
And the script file can be found on this page;
http://multicd.tuxfamily.org/
I strongly suggest you read all the pages in the forum post and the page at tuxfamily to understand how this script is used.
Enjoy!!
TaZMAn
P.S. I hope a few thank you's are in order.
So I put together a small multiboot Cd that will provide you with Damn Small Linux, Puppy Linux and Memtest.
The total size is 136 megs and is split into 2 rar files (Using the script in my previous post) and is available via the 2 Rapidshare links.
MultiCd Part 1 75 Megs
http://rapidshare.com/files/161640669/multicd.iso-Split_RAR-75Megabyte_s_.part1.rar
MultiCd Part 2 61 Megs
http://rapidshare.com/files/161640671/multicd.iso-Split_RAR-75Megabyte_s_.part2.rar
Not only do you have a small Iso file but it contains 2 fully functional Linux systems and a utility to test your Ram! Also, both are very small and fast and will work on older, slower systems with minimal Ram and hardware.
It will also help you to see how a multiboot Cd is made although I have a confession to make.
Every other multiboot disk I have ever made was created by me from scratch. I did all the tedious editting and creating both the loader and menu.
But then I found a forum post that has a script to make multiboot disks.
It supports many distros and even a WinPE compilation.
There is a slight bug however that doesn't seem to affect the final Iso.
It has to do with the genisoimage version 1.1.6
I get an error that it expected a certain value but gets a different value.
No matter. I leave it run and it usually finishes with a working Iso.
But I have had the occasional tests where the script failed after getting that error.
It is a known bug when dealing with genisoimage version 1.1.6
If you use an older version you have no problems.
I must express the fact that the genisoimage bug is not due to itself but rather the way scripts are trying to use genisoimage.
Another con of this script is that it allows a limited choice of Linux distros.
The creator of the script has done a remarkable job of adding many distros but there are some good ones missing.
Also, because many distros use the same kernel you have to be careful of which versions you add into your compilation.
Examples would be Damn Small Linux and Knoppix. They both use the Knoppix kernel. Because the kernel of each Distro needs to be in the root path of the Cd and they are named the same you can't use both on a Cd unless you do custom editting of the files needed to boot up a renamed kernel.
But other then that it does a good job of creating multiboot Iso's.
The forum post can be found here;
http://ubuntuforums.org/showthread.php?t=718016
And the script file can be found on this page;
http://multicd.tuxfamily.org/
I strongly suggest you read all the pages in the forum post and the page at tuxfamily to understand how this script is used.
Enjoy!!
TaZMAn
P.S. I hope a few thank you's are in order.
Tuesday, October 28, 2008
Convert Video With VLC
UPDATE!
There is a new easy to use tool that converts Videos and rips Audio.
It can be found in my blog here;
WinFF Blog Post
In one of my previous blog entries from May, I showed you how to extract audio from a video using VLC.
Now I will show you how to convert videos from one format to another.
Convert avi, DVD vob's, flv, ogg, wmv, divx, mpeg or mp4 for your iPod to any format just mentioned.
And it an easy process that only takes a few minutes to master and doesn't require the installing of several programs. The only thing you need is vlc and the needed codecs installed.
Ready? Let's go!
For you to be able to convert between all the different video formats requires you to have the following codecs installed.
First go to Medibuntu and follow the directions to install the non-free codecs. Here is the link to Medibuntu;
https://help.ubuntu.com/community/Medibuntu
Now from the Synaptic package manager make sure you have the following installed;
gstreamer0.10-plugins-ugly
gstreamer0.10-plugins-ugly-multiverse
gstreamer0.10-plugins-bad
gstreamer0.10-plugins-bad-multiverse
gstreamer0.10-ffmpeg
ffmpeg2theora
All the libavcodec files, w32codecs and all the libdivx files for decoding and encoding.
Once your satisfied that all the needed codecs are installed open up vlc and follow the instructions.
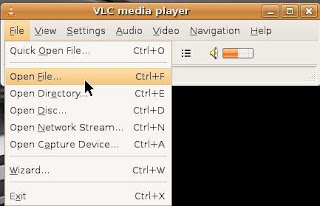
With vlc open go to File and click on Open File. Make sure you don't clcik on the Quick Open button by mistake.
You should see a screen like this;
You will see a screen like below from where you choose the file you want to convert.
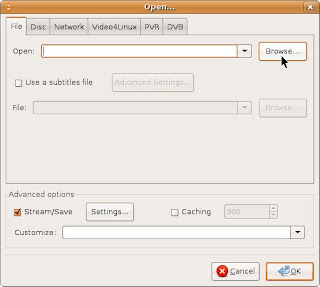
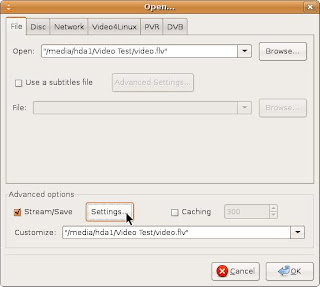
Once you select the video file you need to go down the screen and check the box that says
Stream/Save then click on the Settings button.
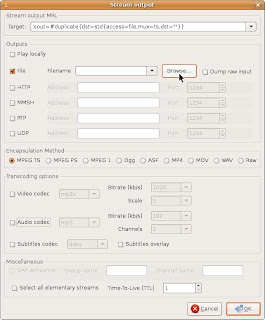
Now you get the screen that is your business screen.
First you need to check the box marked File.
Then click on Browse. You will browse to the folder where you want to save your converted video.
You will also be giving your converted video it's name with the extension.
IMPORTANT! You must add the extension to the name.
Example: I am converting the video Fun.flv to a mp2 mpeg so my new file name will be fun.mpeg
If you don't add the file extension to the end of your new file name it will convert the video into a random file and may not work.
Here you can see my new video file with the .mpeg extension in the file name window.
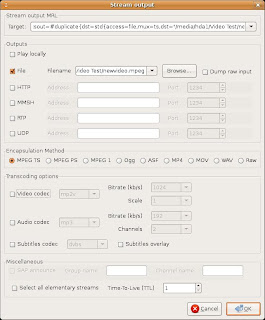
Now go down to the Encapsulation Method. I find that Video TS works the best.
Next click on the Video Codec box and from the drop box choose the video codec that matches the format you want to convert to.
The drop box looks like this;
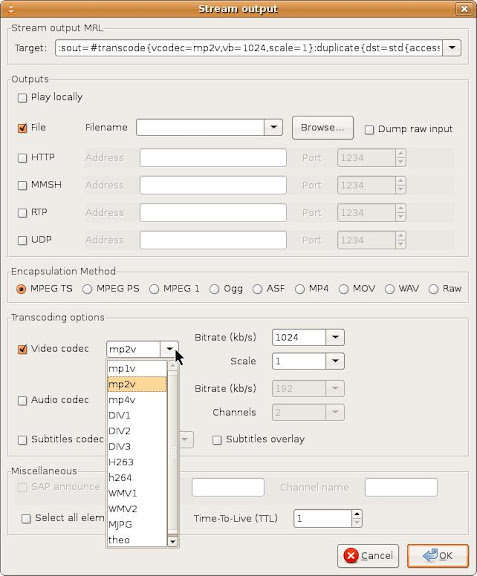
Also make sure the bitrate is set to 1024. Larger bitrates create larger video files.
Scale should be set to one.
Now click on the Audio Codec box and choose mp3 for stereo and set the Channels box to 2 and the bitrate for 192 to get a quality sound output.
You can also use the a52 codec for surround sound if your video is encoded with it. Make sure to set your Channels box to the appropriate number of audio tracks.
The screen will look like this;
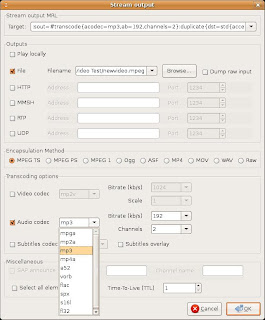
Now click on OK to continue.
You will now see this screen;
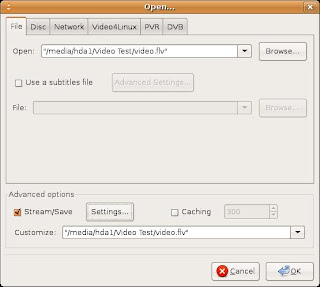
Make sure the video location entries match in the top and bottom boxes.
If they do click on OK.
Now you will see the VLC player position bar slide across as it recodes your video.
When it reaches the end your video is done.
Some final thoughts.
Many of my recoded videos are at a frame rate of 25 fps when I convert.
Also the video remains at the same resolution as the original.
I haven't played with the Scale settings. This may be the way you can enlarge your videos but be advised that too much scaling will cause pixielation. But I let that up to you, the readers, to investigate this setting.
So there you go! An easy way to convert videos to other formats.
Enjoy!
TaZMAn
There is a new easy to use tool that converts Videos and rips Audio.
It can be found in my blog here;
WinFF Blog Post
In one of my previous blog entries from May, I showed you how to extract audio from a video using VLC.
Now I will show you how to convert videos from one format to another.
Convert avi, DVD vob's, flv, ogg, wmv, divx, mpeg or mp4 for your iPod to any format just mentioned.
And it an easy process that only takes a few minutes to master and doesn't require the installing of several programs. The only thing you need is vlc and the needed codecs installed.
Ready? Let's go!
For you to be able to convert between all the different video formats requires you to have the following codecs installed.
First go to Medibuntu and follow the directions to install the non-free codecs. Here is the link to Medibuntu;
https://help.ubuntu.com/community/Medibuntu
Now from the Synaptic package manager make sure you have the following installed;
gstreamer0.10-plugins-ugly
gstreamer0.10-plugins-ugly-multiverse
gstreamer0.10-plugins-bad
gstreamer0.10-plugins-bad-multiverse
gstreamer0.10-ffmpeg
ffmpeg2theora
All the libavcodec files, w32codecs and all the libdivx files for decoding and encoding.
Once your satisfied that all the needed codecs are installed open up vlc and follow the instructions.
With vlc open go to File and click on Open File. Make sure you don't clcik on the Quick Open button by mistake.
You should see a screen like this;

You will see a screen like below from where you choose the file you want to convert.

Once you select the video file you need to go down the screen and check the box that says
Stream/Save then click on the Settings button.

Now you get the screen that is your business screen.
First you need to check the box marked File.
Then click on Browse. You will browse to the folder where you want to save your converted video.
You will also be giving your converted video it's name with the extension.
IMPORTANT! You must add the extension to the name.
Example: I am converting the video Fun.flv to a mp2 mpeg so my new file name will be fun.mpeg
If you don't add the file extension to the end of your new file name it will convert the video into a random file and may not work.

Here you can see my new video file with the .mpeg extension in the file name window.

Now go down to the Encapsulation Method. I find that Video TS works the best.
Next click on the Video Codec box and from the drop box choose the video codec that matches the format you want to convert to.
The drop box looks like this;
Also make sure the bitrate is set to 1024. Larger bitrates create larger video files.
Scale should be set to one.
Now click on the Audio Codec box and choose mp3 for stereo and set the Channels box to 2 and the bitrate for 192 to get a quality sound output.
You can also use the a52 codec for surround sound if your video is encoded with it. Make sure to set your Channels box to the appropriate number of audio tracks.
The screen will look like this;

Now click on OK to continue.
You will now see this screen;

Make sure the video location entries match in the top and bottom boxes.
If they do click on OK.
Now you will see the VLC player position bar slide across as it recodes your video.
When it reaches the end your video is done.
Some final thoughts.
Many of my recoded videos are at a frame rate of 25 fps when I convert.
Also the video remains at the same resolution as the original.
I haven't played with the Scale settings. This may be the way you can enlarge your videos but be advised that too much scaling will cause pixielation. But I let that up to you, the readers, to investigate this setting.
So there you go! An easy way to convert videos to other formats.
Enjoy!
TaZMAn
Sunday, October 12, 2008
Cd / DVD Label and Insert Maker
I made a Cd as a present for some friends of ours.
As I put the Cd in the case, I realized it looked too plain. It needed a case insert.
I played around with making my own case insert using the Open Office word processor but it was tedious and I couldn't get it it quite right.
So I decided to look on the internet for a linux based Cd/DVD case insert maker.
It only took a few seconds for me to find this online label maker;
Online Cd/DVD Maker Mirror
http://www.aczoom.com/tools/cdinsert/
Note: The above link now points to the main web page from which you can access the online label maker. I used to provide a direct link to the online maker but the author keeps changing the address.
It was more then I had hoped for. It not only would make my case inserts for Cd's but also does DVD cases, Cd/DVD labels and envelopes.
All I had to do was enter the song list info, upload a picture and the website generated a file that I could print or save. Excellent!!
But it's an online service (Free) and I wanted a program that allowed me to do the same thing from my computer locally.
Not to worry. I started reading his page and saw a link for the source code which is found here;
Source Code
http://www.aczoom.com/tools/cdinsert/#download
All I had to do was download the cdlabelgen-4.0.0 tar.gz file, extract it and do a make install from the terminal. It was done installing as fast I pressed the Enter button. Notice that I didn't say I used make because that command wasn't needed nor was configure.
Okay! I had the Cd label generator files installed but this only allows me to make labels and inserts from the terminal. Since I'm not one to enjoy typing tons of commands to do a task I needed a GUI for this software.
That's where gtkcdlabel comes in. It provides a graphical user interface that is easy to use and makes labels and inserts in seconds. It also has a preview button that allows you to see what the insert or label looks like before you print it.
And this GUI package comes in the form of a deb file in addition to rpm and source files.
I downloaded the deb file, clicked on it and installed it.
You can get the gtkcdlabel package from here; (Note! They also have the cdlabelgen-4.0.0 packages available for download)
Download Page
http://sourceforge.net/project/showfiles.php?group_id=14155
Once installed, you will find it under your Applications - Office category in your menu if you are using Ubuntu.
The only problem I came across so far had to do with the color option selector.
I would choose a color for the text but it would preview as a different color.
I had used the default black text color when I created the insert for my Cd case and had no issues but it may take some playing around to get the correct color. And I'm not sure if the preview is displaying the wrong color but will print the correct color or if it's a glitch with the software.
Other then that this software gets a 4 thumbs up for saving my present from blandness and turning it into a professional looking Cd case.
And with the option to use the online website to make your inserts and covers, that will allow users of those other OS's to create their own inserts and labels without having to spend $$$ on another piece of software.
Enjoy!
TaZMAn
As I put the Cd in the case, I realized it looked too plain. It needed a case insert.
I played around with making my own case insert using the Open Office word processor but it was tedious and I couldn't get it it quite right.
So I decided to look on the internet for a linux based Cd/DVD case insert maker.
It only took a few seconds for me to find this online label maker;
Online Cd/DVD Maker Mirror
http://www.aczoom.com/tools/cdinsert/
Note: The above link now points to the main web page from which you can access the online label maker. I used to provide a direct link to the online maker but the author keeps changing the address.
It was more then I had hoped for. It not only would make my case inserts for Cd's but also does DVD cases, Cd/DVD labels and envelopes.
All I had to do was enter the song list info, upload a picture and the website generated a file that I could print or save. Excellent!!
But it's an online service (Free) and I wanted a program that allowed me to do the same thing from my computer locally.
Not to worry. I started reading his page and saw a link for the source code which is found here;
Source Code
http://www.aczoom.com/tools/cdinsert/#download
All I had to do was download the cdlabelgen-4.0.0 tar.gz file, extract it and do a make install from the terminal. It was done installing as fast I pressed the Enter button. Notice that I didn't say I used make because that command wasn't needed nor was configure.
Okay! I had the Cd label generator files installed but this only allows me to make labels and inserts from the terminal. Since I'm not one to enjoy typing tons of commands to do a task I needed a GUI for this software.
That's where gtkcdlabel comes in. It provides a graphical user interface that is easy to use and makes labels and inserts in seconds. It also has a preview button that allows you to see what the insert or label looks like before you print it.
And this GUI package comes in the form of a deb file in addition to rpm and source files.
I downloaded the deb file, clicked on it and installed it.
You can get the gtkcdlabel package from here; (Note! They also have the cdlabelgen-4.0.0 packages available for download)
Download Page
http://sourceforge.net/project/showfiles.php?group_id=14155
Once installed, you will find it under your Applications - Office category in your menu if you are using Ubuntu.
The only problem I came across so far had to do with the color option selector.
I would choose a color for the text but it would preview as a different color.
I had used the default black text color when I created the insert for my Cd case and had no issues but it may take some playing around to get the correct color. And I'm not sure if the preview is displaying the wrong color but will print the correct color or if it's a glitch with the software.
Other then that this software gets a 4 thumbs up for saving my present from blandness and turning it into a professional looking Cd case.
And with the option to use the online website to make your inserts and covers, that will allow users of those other OS's to create their own inserts and labels without having to spend $$$ on another piece of software.
Enjoy!
TaZMAn
Wednesday, October 1, 2008
Linux Multi-Boot Disks
Update!
Check my November 7th post for a script to auto-make your own multi-boot disk and links to a small Cd iso image I made using this script.
There seems to be more info and instructions on how to make a multi-boot Windows
based disk then there is for Linux distros.
This is probably due to how different Linux distros boot up.
Some use vmlinuz and syslinux while others use casper to boot up the kernel.
This presents a problem especially when you have several distros that use the same kernel. Examples would be Knoppix, and Damn Small Linux. They both use the Knoppix kernel.
So how do you get around this problem when making a multi-boot Linux disk?
Well there are several options. You can change one of the kernel names then use a hex editor to make the name change in vmlinuz to point it to the proper renamed kernel.
You could also use a Grub Loader menu program to load the proper kernel.
And there is a program available for Windows called Easy Boot that supposedly allows you to add Linux distros to a multi-boot disk.
I have used the first 2 methods for my projects.
Yes, I have made a total of 3 multi-boot Linux disks.
I got interested when I saw a multi-disk in a Linux magazine. Didn't buy the magazine because it was too expensive. So I looked around the internet for info on how to make one.
Info was sparse or even cryptic in nature. But I pieced together the info and designed my first disk using the method of hex editting the vmlinuz files.
That first disk, a DVD, had 7 distros on it.
Not satisfied with it, I started a 2nd project.
That disk used the grub boot menu and had 8 distros on it.
My 3rd disk is more of an updated disk then a fully made from scratch disk.
I happened to find a release from several years ago by someone who also was interested in making a multi-boot Linux disk.
The distros were very old so I redid it with newer releases. This was the easiest of the 3 to make.
LOL!
I am planning one more disk. That will be a Windows-Linux multi-boot.
Will use something like UBCD and either Slax, Gentoo or maybe Knoppix.
That way I will have a ultimate repair disk that I can use to fix both Windows and Linux systems.
Making these disks was a very good challenge and provided me the ability to try out different linux versions. And I did pick out a bunch of non run of the mill versions.
And it has paid off. I have found numerous software that works better for my needs.
Sticking with one or two distros keeps you too confined. Exploring various versions exposes you to the best of the best.
I also learned that all the distros on any of the 3 disks I made do not work on all computers.
It's strange but I guess it all depends on what the version supports.
Some distros hated my newer computer while others wouldn't even boot on my older computer.
That is something I'd like to fix but it would require the adding of drivers to each distro and recompiling each kernel. More work then it's worth because I have the ability to use one of the other distros on the disk.
All three of these disks were run as Live distros. I wouldn't attempt to use them to install that particular version seeing how some of the components were removed during the construction of these disks.
Will I make any more after the Windows/Linux disk?
Doubtful. It was a challenge to myself and I doubt anyone else would be interested in these disks.
I proved to myself that it can be done without cheating like they did with that computer magazine disk.
Cheating!???
What do you mean they cheated?
Well I found out a few weeks later that the magazine used a dual layer DVD and had Ubuntu as their base system. You booted the disk and it started up Ubuntu. Then from Ubuntu you selected that other distros that were installed in vmware.
So they didn't create a 'real' multi-boot disk like I did.
And by running vmware from within Ubuntu while in a 'Live' environment, they require the user to have a fairly powerful computer with plenty of Ram.
My method only uses the needed resources for the single distro running at that time.
That makes it older computer friendly.
So go to Google, look up the info and make your own multi-boot disk.
It's not only fun, it gives you a good feeling after you finish it.
Enjoy!
TaZMAn
Check my November 7th post for a script to auto-make your own multi-boot disk and links to a small Cd iso image I made using this script.
There seems to be more info and instructions on how to make a multi-boot Windows
based disk then there is for Linux distros.
This is probably due to how different Linux distros boot up.
Some use vmlinuz and syslinux while others use casper to boot up the kernel.
This presents a problem especially when you have several distros that use the same kernel. Examples would be Knoppix, and Damn Small Linux. They both use the Knoppix kernel.
So how do you get around this problem when making a multi-boot Linux disk?
Well there are several options. You can change one of the kernel names then use a hex editor to make the name change in vmlinuz to point it to the proper renamed kernel.
You could also use a Grub Loader menu program to load the proper kernel.
And there is a program available for Windows called Easy Boot that supposedly allows you to add Linux distros to a multi-boot disk.
I have used the first 2 methods for my projects.
Yes, I have made a total of 3 multi-boot Linux disks.
I got interested when I saw a multi-disk in a Linux magazine. Didn't buy the magazine because it was too expensive. So I looked around the internet for info on how to make one.
Info was sparse or even cryptic in nature. But I pieced together the info and designed my first disk using the method of hex editting the vmlinuz files.
That first disk, a DVD, had 7 distros on it.
Not satisfied with it, I started a 2nd project.
That disk used the grub boot menu and had 8 distros on it.
My 3rd disk is more of an updated disk then a fully made from scratch disk.
I happened to find a release from several years ago by someone who also was interested in making a multi-boot Linux disk.
The distros were very old so I redid it with newer releases. This was the easiest of the 3 to make.
LOL!
I am planning one more disk. That will be a Windows-Linux multi-boot.
Will use something like UBCD and either Slax, Gentoo or maybe Knoppix.
That way I will have a ultimate repair disk that I can use to fix both Windows and Linux systems.
Making these disks was a very good challenge and provided me the ability to try out different linux versions. And I did pick out a bunch of non run of the mill versions.
And it has paid off. I have found numerous software that works better for my needs.
Sticking with one or two distros keeps you too confined. Exploring various versions exposes you to the best of the best.
I also learned that all the distros on any of the 3 disks I made do not work on all computers.
It's strange but I guess it all depends on what the version supports.
Some distros hated my newer computer while others wouldn't even boot on my older computer.
That is something I'd like to fix but it would require the adding of drivers to each distro and recompiling each kernel. More work then it's worth because I have the ability to use one of the other distros on the disk.
All three of these disks were run as Live distros. I wouldn't attempt to use them to install that particular version seeing how some of the components were removed during the construction of these disks.
Will I make any more after the Windows/Linux disk?
Doubtful. It was a challenge to myself and I doubt anyone else would be interested in these disks.
I proved to myself that it can be done without cheating like they did with that computer magazine disk.
Cheating!???
What do you mean they cheated?
Well I found out a few weeks later that the magazine used a dual layer DVD and had Ubuntu as their base system. You booted the disk and it started up Ubuntu. Then from Ubuntu you selected that other distros that were installed in vmware.
So they didn't create a 'real' multi-boot disk like I did.
And by running vmware from within Ubuntu while in a 'Live' environment, they require the user to have a fairly powerful computer with plenty of Ram.
My method only uses the needed resources for the single distro running at that time.
That makes it older computer friendly.
So go to Google, look up the info and make your own multi-boot disk.
It's not only fun, it gives you a good feeling after you finish it.
Enjoy!
TaZMAn
Subscribe to:
Posts (Atom)

 Posts
Posts


