Tuesday, October 28, 2008

Convert Video With VLC

UPDATE!
There is a new easy to use tool that converts Videos and rips Audio.
It can be found in my blog here;
WinFF Blog Post

In one of my previous blog entries from May, I showed you how to extract audio from a video using VLC.
Now I will show you how to convert videos from one format to another.
Convert avi, DVD vob's, flv, ogg, wmv, divx, mpeg or mp4 for your iPod to any format just mentioned.
And it an easy process that only takes a few minutes to master and doesn't require the installing of several programs. The only thing you need is
vlc and the needed codecs installed.
Ready? Let's go!

For you to be able to convert between all the different video formats requires you to have the following codecs installed.
First go to Medibuntu and follow the directions to install the non-free codecs. Here is the link to Medibuntu;
https://help.ubuntu.com/community/Medibuntu

Now from the Synaptic package manager make sure you have the following installed;

gstreamer0.10-plugins-ugly
gstreamer0.10-plugins-ugly-multiverse
gstreamer0.10-plugins-bad
gstreamer0.10-plugins-bad-multiverse

gstreamer0.10-ffmpeg
ffmpeg2theora
All the libavcodec files, w32codecs and all the libdivx files for decoding and encoding.

Once your satisfied that all the needed codecs are installed open up vlc and follow the instructions.

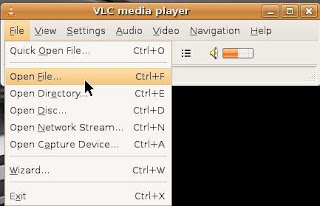
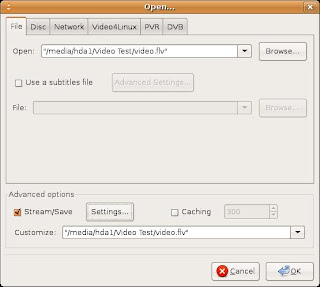
With vlc open go to File and click on Open File. Make sure you don't clcik on the Quick Open button by mistake.
You should see a screen like this;


You will see a screen like below from where you choose the file you want to convert.
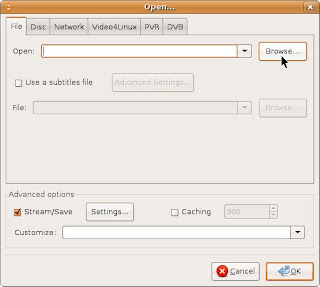


Once you select the video file you need to go down the screen and check the box that says
Stream/Save then click on the Settings button.
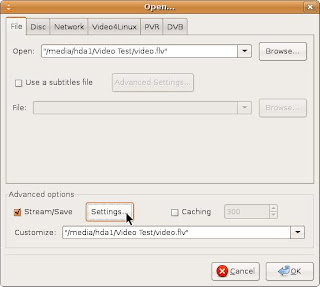


Now you get the screen that is your business screen.
First you need to check the box marked File.
Then click on Browse. You will browse to the folder where you want to save your converted video.
You will also be giving your converted video it's name with the extension.
IMPORTANT! You must add the extension to the name.
Example: I am converting the video Fun.flv to a mp2 mpeg so my new file name will be fun.mpeg
If you don't add the file extension to the end of your new file name it will convert the video into a random file and may not work.
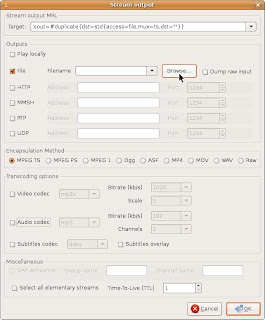


Here you can see my new video file with the .mpeg extension in the file name window.
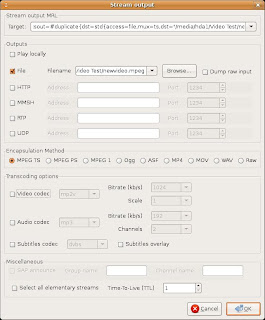


Now go down to the Encapsulation Method. I find that Video TS works the best.
Next click on the Video Codec box and from the drop box choose the video codec that matches the format you want to convert to.
The drop box looks like this;
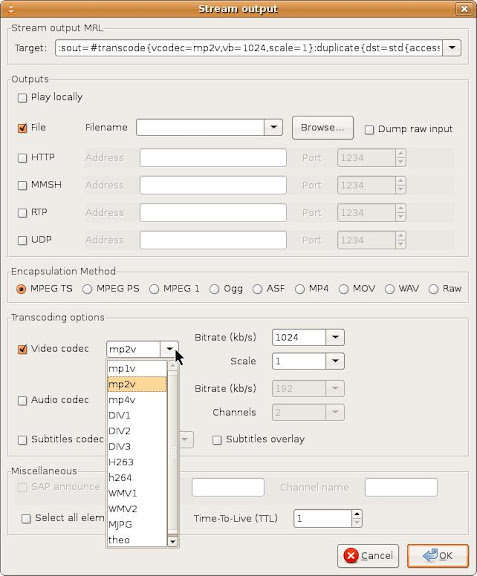


Also make sure the bitrate is set to 1024. Larger bitrates create larger video files.
Scale should be set to one.

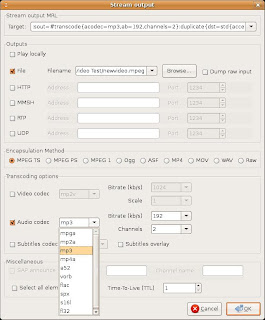
Now click on the Audio Codec box and choose mp3 for stereo and set the Channels box to 2 and the bitrate for 192 to get a quality sound output.
You can also use the a52 codec for surround sound if your video is encoded with it. Make sure to set your Channels box to the appropriate number of audio tracks.
The screen will look like this;


Now click on OK to continue.
You will now see this screen;


Make sure the video location entries match in the top and bottom boxes.
If they do click on OK.
Now you will see the VLC player position bar slide across as it recodes your video.
When it reaches the end your video is done.

Some final thoughts.
Many of my recoded videos are at a frame rate of 25 fps when I convert.
Also the video remains at the same resolution as the original.
I haven't played with the Scale settings. This may be the way you can enlarge your videos but be advised that too much scaling will cause pixielation. But I let that up to you, the readers, to investigate this setting.

So there you go! An easy way to convert videos to other formats.

Enjoy!

TaZMAn

Thursday, October 23, 2008

Audacious Media Player Waste of Time

With XMMS going by the wayside as in no more development I decided to see what was available as a replacement in my Gutsy system.
A quick Google search presents me with a media player going by the name Audacious. That name couldn't be a better fit. And I need to point out that you should not confuse this program with Audacity which is a very good audio editor in it's own right.

I open up the Synaptic Package Manager and do a search for Audacious. Mark the main package and try to mark the plug-ins but it's not going to happen. When I marked the main package for installation it popped up an error that said it can't be installed because the plug-ins aren't going to be installed. HUH!!!

I'm trying to mark the plug-ins but the main package error prevents me from adding them on.
So I try marking the plug-ins first. Same problem. I get an error message that the main program isn't going to be installed so the plug-ins can't be installed.
This is NUTS!!!

Alright then. I'll go to their website and see what's going on. I click on the link for their site from a Google search and am presented with a page that says "It Works!"
That's nice. Maybe that page works but the software package sure doesn't. I'm getting this bad feeling. Packages are messed up and the website is down.

Okay! I'll go and grab the .deb packages. Download them and when I try to install them I get the same errors as I did in Synaptic.
GRR....!!!!!!

Okay! Sigh! I'll grab the source code and compile it from there. So I grab the base and plug-in source code and get to work.
Dependency errors! Drat! Or should I say error because it said I was missing one file.
Go and grab the source for that file, compile and install it.
Back to the main package. Another dependency error. After about 5 of these I finally get the main package installed.

Next I install the 3 plug-in packages and thankfully they go much easier.
Now I open up Audacious and it looks suspiciously similar to XMMS even though the developers have said in many articles that they are trying to design a media player that is not a continuation of XMMS and will stand on it's own merit.

I open the file browser and tell Audacious to open an Mp3 file.
ERROR! Either the file permissions are not set properly or you don't have the proper codec installed.
I check to see what plug-ins I have installed. There is a whole list of them but no where do I see one for playing Mp3's. I check on a few forums and apparently that plug-in should be either in the base or dev plug-in package.

So I reinstall the plug-in packages. Still no luck. I go online to see if I can find any other info. Plenty of people posting about problems opening Mp3 files but no real solutions other then to make sure the plug-in packages were installed.

That's when I made my decision. Sudo apt-get remove audacious and all the plug-ins.
I knew this package was a bad omen when I had problems installing through Synaptic and found a dead website.

I'll stick with VLC. It has some quirks but the additional features like audio ripping and video conversion more then make up for those few minor annoyances.
And I have to really wonder what direction Audacious will really take.
Broken .deb packages and websites that are down do not paint a rosey picture for it's future.
I know it left a very bad taste in my mouth and it will take the Audacious developers a lot of work and plenty of add on features for me to even take a look at it again.

In retrospect I did get a good refresher course on compiling and installing from a source package and I honed my skills on finding missing dependency packages.
But the time wasted on a software product of shoddy construction was time I could have used on better things.

TaZMAn


Wednesday, October 22, 2008

Blog Entry Poster

Just downloaded and trying out a piece of software available through the Synaptic Package Manager called Blog Entry Poster.


It allows me to add new posts to this blog right from my desktop. No need to open up Firefox and log in to my page.


Well I guess I will still have to open my browser and go to my blog to see how this turned out. I do know one con about this software and that is the inability to add tags to any posts made with this software. It will require me to still log into my blog and edit the post to add the tags.


But this is still a good utility. Especially if I'm doing something and I want to do a quick post on this blog.


Enjoy!


TaZMAn


Shoutcast Bug In Streamtuner

So last week I fired up Streamtuner. It's been awhile since I have used it to listen to online music now that I have been using Songbird, so I was a bit upset when I couldn't get any listings for the Shoutcast feed.
At first I thought there was a glitch with their server but after a few days of checking it, I found it was still not working.
So I went digging.

Turns out that Shoutcast changed their website. The old Streamtuner plug-in doesn't work with the new design. What needed to be done was to fire up a hex editor and update the plug-in. But not an update that would use their new site feed. Nope! That would require a full rewrite of the plug-in code.

What I did was to find the Shoutcast address in the plug-in and change it to the new address that points to the old site that Shoutcast is maintaining.

Here's what you need to do in order to fix the Shoutcast plug-in.
Fire up your favorite hex editor and use it to open up the shoutcast.so plug-in found in usr/lib/streamtuner/plugins.
Now search for the two instances of www.shoutcast.com and replace them with
205.188.234.120 making sure you keep the spacing sane.
Now save it back into your folder.
Open up Streamtuner and go to the Shoutcast tab. You should now see your listings. If your don't just click on the Reload button.

For those of you who are saying that you don't know how to use a hex editor, no worries.
Here is a link to the patched shoutcast plug-in.
Download Plugin

Copy the plug-in, go to usr/lib/streamtuner/plugins folder. Open it as Root. Delete the existing shoutcast.so file and paste this patched file in to the folder.
Now open up Streamtuner, go to the Shoutcast tab and your listings should show up.

This is only a quick fix as it doesn't allow Streamtuner to access the new Shoutcast site and categories. Streamtuner itself needs to be fixed. I believe the original designer quit the project several years ago as there haven't been any updated versions. But I do believe there are some people maintaining it and hopefully they will release a newer 'fixed' version.

Update!!!

Thanks to Ernie for this easy fix that offers more functionality.

An alternative solution can be to edit your hosts file (/etc/hosts) and add the following line:
205.188.234.120 www.shoutcast.com
That overrides the shoutcast.com ip address provided by the DNS. It fixes the issue and you can access the webpage from the browser too.

Thanks again Ernie!


Enjoy!

TaZMAn

Sunday, October 12, 2008

Install Additional Compiz Plugins In Gutsy And Newer Versions

This post is only for Gutsy users. If you have Hardy and have the up to date Compiz installed you should already have these plugins.

Do you want all those cool plugins like you see in those youtube videos?
Stuff like 3D Windows, Atlantis, Snow Globe, Photo Wheel, Wallpaper and several others?

It's real easy. If your using Gutsy, get on over to this Compiz-Fusion page
http://forum.compiz-fusion.org
/showthread.php?t=5303

For newer Linux releases you can view the list of all available plugins from this page;
All Plugins
http://wiki.compiz-fusion.org/

To download and install them (You will need Git) follow the directions found here;
Downloads
http://wiki.compiz-fusion.org/Install/PluginsFromGit


Enjoy your new plugins!

Here is a screen grab of my cube.


And here's a video I found at youtube for your entertainment.


Enjoy!

TaZMAn

Cd / DVD Label and Insert Maker

I made a Cd as a present for some friends of ours.
As I put the Cd in the case, I realized it looked too plain. It needed a case insert.
I played around with making my own case insert using the Open Office word processor but it was tedious and I couldn't get it it quite right.

So I decided to look on the internet for a linux based Cd/DVD case insert maker.
It only took a few seconds for me to find this online label maker;

Online Cd/DVD Maker Mirror
http://www.aczoom.com/tools/cdinsert/

Note: The above link now points to the main web page from which you can access the online label maker. I used to provide a direct link to the online maker but the author keeps changing the address.

It was more then I had hoped for. It not only would make my case inserts for Cd's but also does DVD cases, Cd/DVD labels and envelopes.

All I had to do was enter the song list info, upload a picture and the website generated a file that I could print or save. Excellent!!

But it's an online service (Free) and I wanted a program that allowed me to do the same thing from my computer locally.
Not to worry. I started reading his page and saw a link for the source code which is found here;
Source Code
http://www.aczoom.com/tools/cdinsert/#download

All I had to do was download the cdlabelgen-4.0.0 tar.gz file, extract it and do a make install from the terminal. It was done installing as fast I pressed the Enter button. Notice that I didn't say I used make because that command wasn't needed nor was configure.

Okay! I had the Cd label generator files installed but this only allows me to make labels and inserts from the terminal. Since I'm not one to enjoy typing tons of commands to do a task I needed a GUI for this software.

That's where gtkcdlabel comes in. It provides a graphical user interface that is easy to use and makes labels and inserts in seconds. It also has a preview button that allows you to see what the insert or label looks like before you print it.
And this GUI package comes in the form of a deb file in addition to rpm and source files.
I downloaded the deb file, clicked on it and installed it.

You can get the gtkcdlabel package from here; (Note! They also have the cdlabelgen-4.0.0 packages available for download)
Download Page
http://sourceforge.net/project/showfiles.php?group_id=14155

Once installed, you will find it under your Applications - Office category in your menu if you are using Ubuntu.

The only problem I came across so far had to do with the color option selector.
I would choose a color for the text but it would preview as a different color.
I had used the default black text color when I created the insert for my Cd case and had no issues but it may take some playing around to get the correct color. And I'm not sure if the preview is displaying the wrong color but will print the correct color or if it's a glitch with the software.

Other then that this software gets a 4 thumbs up for saving my present from blandness and turning it into a professional looking Cd case.

And with the option to use the online website to make your inserts and covers, that will allow users of those other OS's to create their own inserts and labels without having to spend $$$ on another piece of software.

Enjoy!

TaZMAn

Wednesday, October 1, 2008

Linux Multi-Boot Disks

Update!
Check my November 7th post for a script to auto-make your own multi-boot disk and links to a small Cd iso image I made using this script.

There seems to be more info and instructions on how to make a multi-boot Windows
based disk then there is for Linux distros.
This is probably due to how different Linux distros boot up.
Some use vmlinuz and syslinux while others use casper to boot up the kernel.

This presents a problem especially when you have several distros that use the same kernel. Examples would be Knoppix, and Damn Small Linux. They both use the Knoppix kernel.

So how do you get around this problem when making a multi-boot Linux disk?
Well there are several options. You can change one of the kernel names then use a hex editor to make the name change in vmlinuz to point it to the proper renamed kernel.

You could also use a Grub Loader menu program to load the proper kernel.
And there is a program available for Windows called Easy Boot that supposedly allows you to add Linux distros to a multi-boot disk.
I have used the first 2 methods for my projects.

Yes, I have made a total of 3 multi-boot Linux disks.
I got interested when I saw a multi-disk in a Linux magazine. Didn't buy the magazine because it was too expensive. So I looked around the internet for info on how to make one.
Info was sparse or even cryptic in nature. But I pieced together the info and designed my first disk using the method of hex editting the vmlinuz files.
That first disk, a DVD, had 7 distros on it.

Not satisfied with it, I started a 2nd project.
That disk used the grub boot menu and had 8 distros on it.

My 3rd disk is more of an updated disk then a fully made from scratch disk.
I happened to find a release from several years ago by someone who also was interested in making a multi-boot Linux disk.
The distros were very old so I redid it with newer releases. This was the easiest of the 3 to make.
LOL!

I am planning one more disk. That will be a Windows-Linux multi-boot.
Will use something like UBCD and either Slax, Gentoo or maybe Knoppix.
That way I will have a ultimate repair disk that I can use to fix both Windows and Linux systems.

Making these disks was a very good challenge and provided me the ability to try out different linux versions. And I did pick out a bunch of non run of the mill versions.
And it has paid off. I have found numerous software that works better for my needs.
Sticking with one or two distros keeps you too confined. Exploring various versions exposes you to the best of the best.

I also learned that all the distros on any of the 3 disks I made do not work on all computers.
It's strange but I guess it all depends on what the version supports.
Some distros hated my newer computer while others wouldn't even boot on my older computer.
That is something I'd like to fix but it would require the adding of drivers to each distro and recompiling each kernel. More work then it's worth because I have the ability to use one of the other distros on the disk.

All three of these disks were run as Live distros. I wouldn't attempt to use them to install that particular version seeing how some of the components were removed during the construction of these disks.

Will I make any more after the Windows/Linux disk?
Doubtful. It was a challenge to myself and I doubt anyone else would be interested in these disks.
I proved to myself that it can be done without cheating like they did with that computer magazine disk.

Cheating!???
What do you mean they cheated?

Well I found out a few weeks later that the magazine used a dual layer DVD and had Ubuntu as their base system. You booted the disk and it started up Ubuntu. Then from Ubuntu you selected that other distros that were installed in vmware.
So they didn't create a 'real' multi-boot disk like I did.
And by running vmware from within Ubuntu while in a 'Live' environment, they require the user to have a fairly powerful computer with plenty of Ram.

My method only uses the needed resources for the single distro running at that time.
That makes it older computer friendly.

So go to Google, look up the info and make your own multi-boot disk.
It's not only fun, it gives you a good feeling after you finish it.

Enjoy!

TaZMAn